vue-lazyload除了图片赖加载还能够做什么
众所周知,vue-lazyload是一款支持vue2.x和vue1.x的图片赖加载库,不过在写这篇文章的时候,库的相关作者已经fork了vue3的版本,可以直接用V3了。本文就如何实现做一下讲解,以及除了图片赖加载我们还能做什么。
目录
- vue-lazyload如何实现
- vue-lazyload如何实现埋点需求
- 如何实现vue-lazyload的vue3版本
如何实现
其库大概实现流程如下 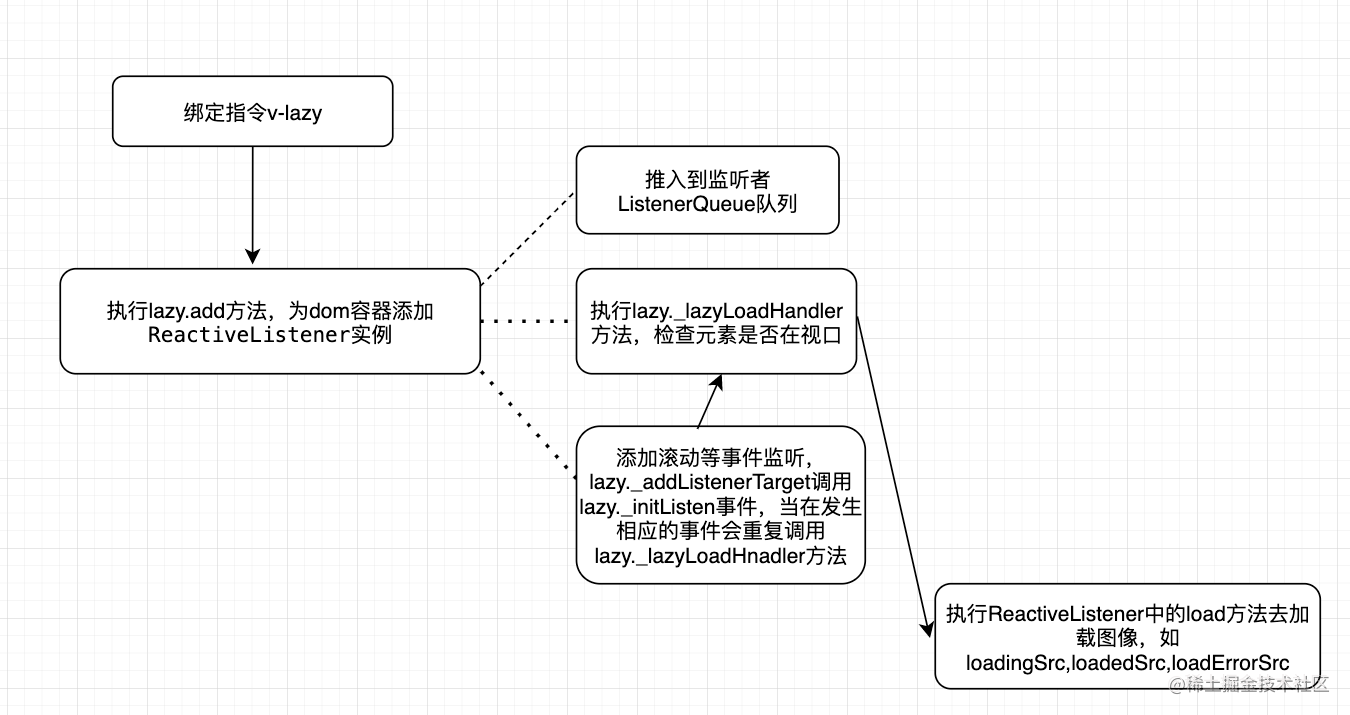
- 绑定指令
- 添加当前元素监听队列
- 监听元素滚动模式
- 使用
MutationObserver来监听元素
- 加载过程中设置图片状态 loadingSrc loadedSrc loaderrorSrc 包括
vue-lazyload中的filter,adapter等也是在初始化lisener.js中的ReactiveListener实例中或者执行其load的时候去执行的。关键代码如下
js
  load (onFinish = noop) {
    if ((this.attempt > this.options.attempt - 1) && this.state.error) {
      if (!this.options.silent) console.log(`VueLazyload log: ${this.src} tried too more than ${this.options.attempt} times`)
      onFinish()
      return
    }
    if (this.state.rendered && this.state.loaded) return
    if (this._imageCache.has(this.src)) {
      this.state.loaded = true
      this.render('loaded', true)
      this.state.rendered = true
      return onFinish()
    }

    this.renderLoading(() => {
      this.attempt++

      this.options.adapter['beforeLoad'] && this.options.adapter['beforeLoad'](this, this.options)
      this.record('loadStart')

      loadImageAsync({
        src: this.src,
        cors: this.cors
      }, data => {
        this.naturalHeight = data.naturalHeight
        this.naturalWidth = data.naturalWidth
        this.state.loaded = true
        this.state.error = false
        this.record('loadEnd')
        this.render('loaded', false)
        this.state.rendered = true
        this._imageCache.add(this.src)
        onFinish()
      }, err => {
        !this.options.silent && console.error(err)
        this.state.error = true
        this.state.loaded = false
        this.render('error', false)
      })
    })
  }
实现埋点需求
上面我们已经讲述了vue-lazyload的实现,可知vue-lazyload针对图片实现的主要功能有两点
- 对图片的懒加载,只包含img标签,且只读写img标签的src属性
- 对组件赖加载,判定组件再视图区域,然后加载(或者开启MutationObserver API)
日常开发中,埋点大体分为两类
- 点击埋点
- 曝光埋点 对于点击埋点和页面曝光很好处理,但对于元素曝光,就显得不是那么好处理了。其实处理元素曝光的解决方案再HTML5规范里有一个mutationObserve的api,大概使用方法如下
ts
      <div ref="observe" class="observe-li"></div>
      ...
      import 'intersection-observer'
      const observes = []
      Vue.$nextTick(() => {
        const obserRef = new IntersectionObserver(entries => {
          entries.forEach(v => {
            const { item } = v.target.dataset
            const itemData = JSON.parse(item)
            if (observes.has(itemData.id)) {
              obserRef.unobserve(v.target)
            } else if (v.isIntersecting) {
              // @todo 做埋点
            }
          })
        })
        const items = document.querySelectorAll('.observe-li')??[]
        items.forEach(item => obserRef.observe(item))
     })
但其缺点也很明显:
- 第一:每次都要往dom标签里也埋点值
- 第二:有元素曝光的地方,每次都要写这一套东西,就很烦
那么我们能不能利用vue-lazyload的特性把埋点功能给集成进去呢。答案是可以的。
步骤如下
- 注册自定义的指令,点击事件
v-click曝光事件v-view自定义方法为@view - 添加一个
listenner的实例,我们可以模仿lazyImage来写一个lazyDom文件来监听视图元素是否进入视图中,上报相应的埋点数据
html
<div @view="uploadTracking({id:2})" v-view></div>
... methods:{ uploadTracking(options){ @TODO 埋点 } }
lazyDom如下
js
import { CustomEvent } from "./util";
export default function (
  lazy,
  { preLoad = 1.3, preLoadTop = 0, domTypes = [] },
) {
  return class LazyDom {
    constructor({ el, viewParams = {} }) {
      this.eleLoaded = false;
      this.state = {
        inited: false,
        loaded: false,
      };
      console.log(el);
      this.$el = el;
      this.el = el;
      this.viewParams = viewParams;
      this.viewed = false;
      this.options = {
        preLoad: preLoad,
        preLoadTop: preLoadTop,
        domTypes: [],
      };
      this.destroy = false;
    }

    addLazyDom() {
      if (!this.state.inited) {
        this.state.inited = true;
        // 添加listenner
        lazy.addLazyBox(this);
        lazy.lazyLoadHandler();
      }
    }
    getRect() {
      this.rect = this.$el.getBoundingClientRect();
    }
    update() {}
    checkInView() {
      this.getRect();
      return (
        this.rect.top < window.innerHeight * this.options.preLoad &&
        this.rect.bottom > this.options.preLoadTop &&
        this.rect.left < window.innerWidth * this.options.preLoad &&
        this.rect.right > 0
      );
    }
    load() {
      if (!this.state.loaded) {
        this.state.loaded = true;
        this.triggerEleView();
      }
    }
    $destroy() {
      this.$el = null;
    }
    triggerEleView() {
      if (!this.viewed && this.state.loaded) {
        const event = new CustomEvent("view", {
          detail: {},
        });
        this.$el.dispatchEvent(event);
        this.viewed = true;
      }
    }
  };
}
实现vue-lazyload的vue3版本
这里面主要是指令的挂载形式变了,所以我们只需要关注指令的差异即可。差异如下表格
| vue2 | - |
|---|---|
bind | 只调用一次,指令第一次绑定到元素时调用。在这里可以进行一次性的初始化设置。 |
inserted | 被绑定元素插入父节点时调用 (仅保证父节点存在,但不一定已被插入文档中)。 |
update | 所在组件的 VNode 更新时调用,但是可能发生在其子 VNode 更新之前。指令的值可能发生了改变,也可能没有 |
componentUpdated | :指令所在组件的 VNode 及其子 VNode 全部更新后调用。 |
unbind | 只调用一次,指令与元素解绑时调用 |
| vue3 | ---a |
|---|---|
created | 在绑定元素的 attribute 或事件监听器被应用之前调用。在指令需要附加在普通的 v-on 事件监听器调用前的事件监听器中时,这很有用。 |
beforeMount | 当指令第一次绑定到元素并且在挂载父组件之前调用。 |
mounted | 在绑定元素的父组件被挂载后调用。 |
beforeUpdate | 在更新包含组件的 VNode 之前调用。 |
updated | 在包含组件的 VNode 及其子组件的 VNode 更新后调用。 |
beforeUnmount | 在卸载绑定元素的父组件之前调用 |
unmounted | 当指令与元素解除绑定且父组件已卸载时,只调用一次 |
可以得出其对应关系
bind--->createdinserted--->mountedupdate--->beforeUpdatecomponentUpdated--->updatedunbind--->unmounted
已vue-lazy的v-lazy为例,改成如下即可
js
// vue2 版本
Vue.directive("lazy", {
  bind: lazy.add.bind(lazy),
  update: lazy.update.bind(lazy),
  componentUpdated: lazy.lazyLoadHandler.bind(lazy),
  unbind: lazy.remove.bind(lazy),
});
// vue3版本
Vue.directive("lazy", {
  bind: lazy.add.bind(lazy),
  update: lazy.update.bind(lazy),
  updated: lazy.lazyLoadHandler.bind(lazy),
  unbind: lazy.remove.bind(lazy),
});